
AxioR


![]()
Riggers are key equipment. Bad riggers waste time, disrupt training and lose you races!
Only AeRoWing riggers combine the engineered optimum of lightness, durability, stiffness and strength with extremely low wind-and-water resistance. No other riggers combine all of these attributes nor match the life-span of AeRoWing – they outlast the rest.
AxioR is a solid stainless steel swivel pin with a race-proven patent mechanism for independent adjustment of lateral and fore/aft pitches - it cannot slip. AxioR is easily adjustable with no need to bend the pin in order to achieve the required pitches.
- Setting up AxioR
- Adjusting AxioR
- Stripping and rebuilding the AxioR™ pitching system
- Fitting new snap washer
Full pdf instructions on how to assemble your Axior and pitch your rigging.
Set–up AxioR on the AeRoWing rigger like this:
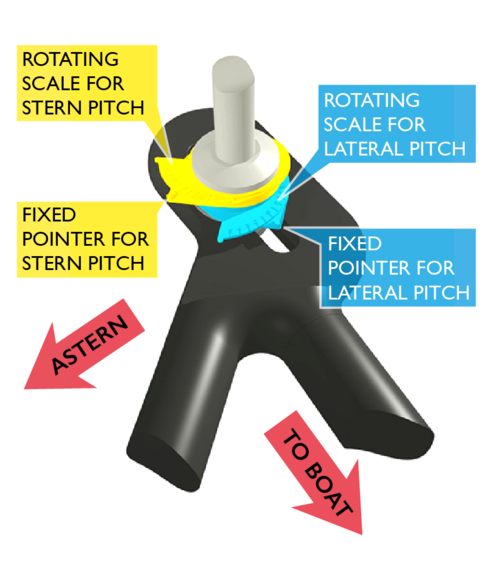
YELLOW SCALE TOWARDS STERN
BLUE SCALE TOWARDS BOAT
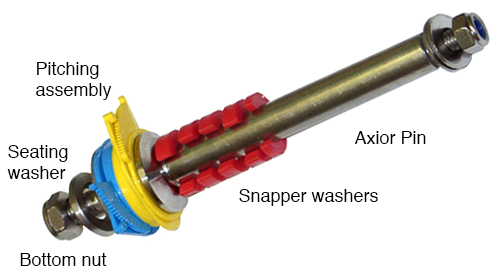
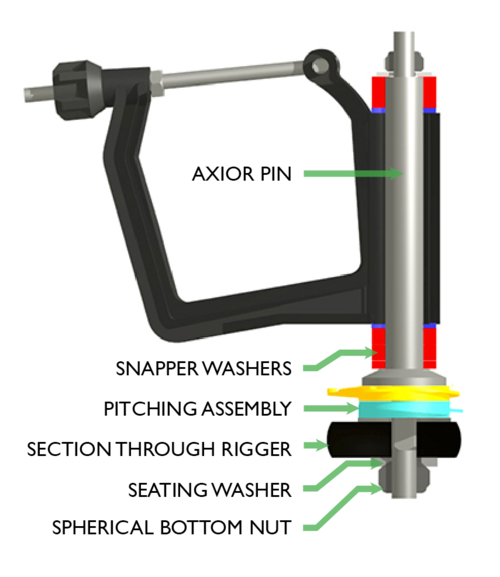
AxioR pins are supplied in handed pairs for this purpose – one for bowside/starboard and one for strokeside/port.AxioR is held completely immovable by one large (17mm) bottom nut. As the pin can be pitched by up to 5° in any direction, this nut has a spherical face which must fit snugly into the special seating washer.
Pitch adjustment with AxioR is easy but you can only change pitch when the spherical faced bottom nut is undone enough to allow easy movement of the scales. Never use force.
NB If fitting AxioR to other makes of rigger the slot will be wide than the 9.5mm/3/8” AeRoWing slot, so you should have no difficulty in mounting the pin. And for thicker rigger ends you do need a wider slot to allow AxioR to tilt at up to a maximum 5 degrees when adjusted. This wider slot may mean that you have to hold the fore/aft alignment of the pin as you first tighten the bottom nut, but when the nut starts to tighten the pin will no longer need this support and you can completely tighten the bottom nut.
We will assume you know how much adjustment you wish to make. So begin here:
- Loosen the bottom nut by at least 1½ turns, so the scales are free to rotate.
- Choose the correct scale:
STERN (fore/aft) PITCH SCALE – pointer towards stern
LATERAL PITCH SCALE – pointer towards boat - Rotate the chosen scale past its pointer, in the correct direction and by the exact amount required to cancel the measured error in pitch. Remember rotating clockwise pitches the pin towards the scale, anticlockwise pitches the pin away.
- Adjusting one pitch scale does not alter the pitch on the other scale, but it’s wise to check that you did not change anything by mistake.
- Tighten the bottom nut with normal force (it cannot work loose).
- Check that you have made the correct adjustments then go row!
NB If fitting AxioR to other makes of rigger the slot will be wide than the 9.5mm/3/8” AeRoWing slot, so you should have no difficulty in mounting the pin. And for thicker rigger ends you do need a wider slot to allow AxioR to tilt at up to a maximum 5 degrees when adjusted. This wider slot may mean that you have to hold the fore/aft alignment of the pin as you first tighten the bottom nut, but when the nut starts to tighten the pin will no longer need this support and you can completely tighten the bottom nut.
Stripping the pitching assembly
- Remove everything except pitch assembly from pin. Mount pin, inverted with large thread and pitching system uppermost, in a bench vice, holding by its main part next to the broad steel shoulder. Be sure the vice jaws have soft alloy, resin or wood faces as gripping with the knurled steel jaws will wreck the pin.
- Pry off the thin stainless steel “snap washer” which holds pitch assembly onto pin, by driving metal wedges in from opposite sides between snap washer and adjacent pitch component or between any pair of pitch components within the pitching assembly (you won’t be re–using these items). The most obvious wedges for this may be two wood chisels, preferably not less than 25mm/1” wide.Take care, you need your fingers to row!
- The snap washer engages in 4 notches in the squared shank. Removal requires some force. It won’t damage the pin but may damage the washer.
- Clean exposed region before fitting the new assembly.
Fitting new pitching assembly
- The pitch components provide precise adjustment on two axes at right angles. By convention we assemble as shown in the illustrations. The Combined Assembly shows a port/stroke–side set–up. The yellow components face astern to control stern pitch, the blue ones face should inboard to control lateral pitch.
- Slide yellow pitch disc with numbered scale onto squared shank, face towards large shoulder of pin. Add drops of heavy lubricant (oil or grease).
- Now add yellow pitch slide, facing as indicated, sliding its slot over the squared shank and engaging its peg into the notch in the first component.
- Lubricate. Then slide on yellow slave pitch disc (it has no scale). The stern–pitch system is now in place. Lubricate exposed face.
- Slide blue pitch disc with scale up against last yellow component, either as shown, or rotated by 180° for opposite side of the boat. Lubricate.
- Add blue pitch slide, lubricate and add blue slave pitch disc.
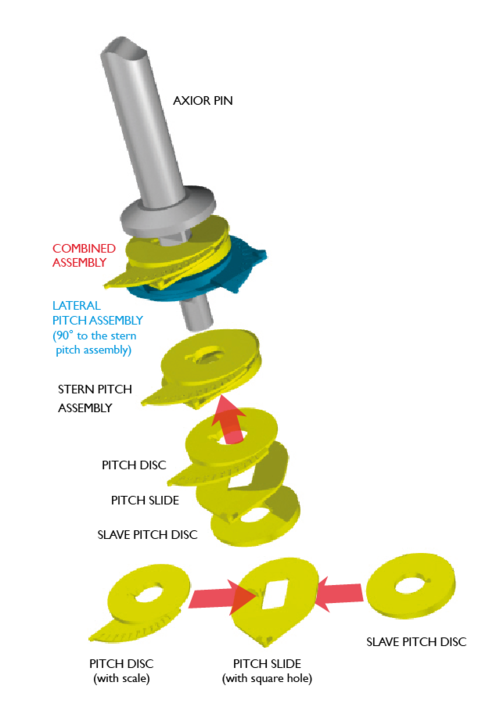
- This must be driven down into the four notches. Tap onto squared shank of pin using a tube or a long socket wrench (e.g. as used for spark plugs).
- When it is onto squared section, slip square–hole end of socket wrench (which should neatly fit) over square shank and, with a large hammer, drive it down until washer is in notches and turns freely. Tap down any small burrs from the fitting process and replace seating washer, bottom nut, etc.